How to Prepare Images for High-Quality T-Shirt Printing
1. Why Image Quality Matters in Printing
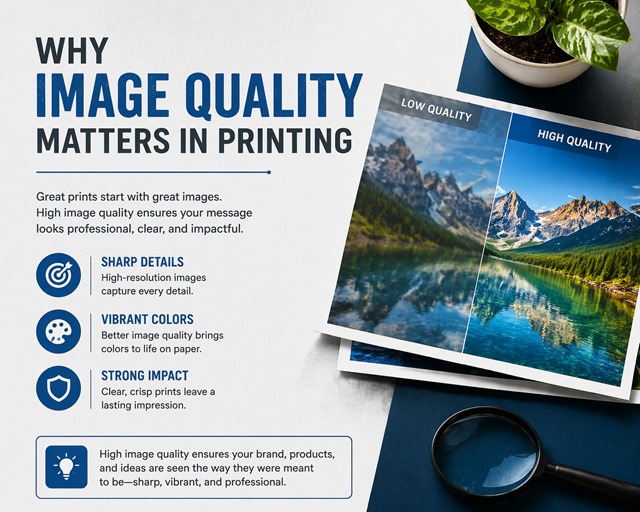
Images that look sharp on a phone or laptop don’t always translate well onto fabric. Screens display light, while printed garments rely on ink interacting with material. That difference changes how detail, colour, and sharpness appear once an image leaves the digital space and becomes a physical product.
A design might look perfectly fine when viewed at a small size on screen, but printing enlarges every flaw. Slight blur, pixelation, or compression artefacts that go unnoticed digitally can become obvious once printed. Edges may appear soft rather than crisp, colours may lose their vibrancy, and fine details may disappear altogether.
Fabric adds another variable. Unlike a flat digital display, fabric has texture. Ink sits differently depending on the material, and that affects how the image is perceived. A smooth graphic on screen can lose sharpness when printed, especially when the artwork lacks proper preparation.
Preparation plays a key role here. A well-prepared file accounts for resolution, sizing, colour, and format before printing begins. Without that preparation, even a strong design can lose impact. Getting the basics right ensures that what you see on screen is as close as possible to what ends up on the garment.
Designers and beginners often underestimate this step. They focus on the visual idea but overlook the technical setup behind it. In practice, both matter equally. A great design needs a properly prepared file to perform well in print.
2. Resolution and Image Size Explained
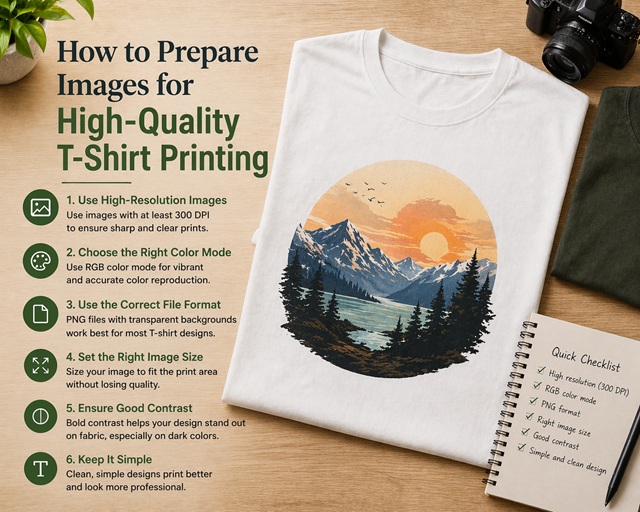
Resolution controls how much detail an image holds. In printing, DPI (dots per inch) measures how many pixels sit within each inch of the design. The more pixels an image contains, the sharper and clearer it will appear when printed. A standard benchmark for high-quality printing is 300 DPI, as this level of detail keeps the design looking crisp at its intended size.
Lower resolution images can still look acceptable on screens because displays don’t require the same level of detail. However, printing exposes those limitations. When resolution drops too low, images appear pixelated or blurry because there simply isn’t enough information to recreate the design clearly.
Image size works alongside resolution.DPI only becomes meaningful when paired with the intended print size. An image that looks fine at a small size can lose quality when scaled up. Enlarging a low-resolution image doesn’t add detail — it stretches the existing pixels, which leads to visible degradation.
For example, an image that is 1000 pixels wide might look fine online, but printing it at a large size will reveal its limitations. A higher-resolution version of the image is required to maintain clarity at that size.
Working at the correct dimensions from the start avoids this issue. Designers should create or export artwork at the final print size, using 300 DPI as a guideline. That approach ensures the file holds enough detail to produce a sharp, clean result.
It’s also important to avoid resizing images multiple times. Each adjustment can reduce quality, especially if compression is involved. Starting with a high-resolution file and maintaining it throughout the process leads to better results.
Vector graphics provide an alternative approach. Unlike pixel-based images, vectors are built from paths and shapes rather than fixed pixels. Vector graphics scale infinitely without losing quality. Logos, text, and simple graphics often benefit from being created in vector format.
Understanding the relationship between resolution and size helps prevent one of the most common printing issues. When the image contains enough detail at the correct dimensions, the final result will appear clean and sharp.
3. File Formats and Transparency
Choosing the right file format affects how an image behaves during printing. Different formats store data in different ways, and that influences quality, flexibility, and compatibility.
JPEG files work well for photographs and keep file sizes small, but they rely on compression that reduces image quality. Each time you save a JPEG, the file loses a small amount of detail, and repeated edits gradually degrade the image. That loss may not show immediately on screen, but it often becomes visible in print. JPEG files also lack transparency, which limits their use for designs that require clean edges or a solid background.
Designers often use PNG files for t-shirt printing because they preserve detail and support transparency, which allows designs to sit cleanly on a garment without a visible background box. PNG files also retain more detail because they use lossless compression, meaning the image quality remains consistent.
Vector formats such as AI, EPS, or SVG offer another advantage. Vector formats allow designs to scale without loss of quality, making them ideal for logos, text, and graphics that require resizing. Vector files also provide more flexibility during editing, which can be useful when adjusting designs for print.
Transparency plays an important role when preparing artwork. A transparent background ensures that only the design itself is printed, rather than a solid block behind it. That becomes particularly important when the design does not cover the entire print area.
Without transparency, the background may print as a visible shape, which can affect the garment's overall look. Using PNG or vector formats helps avoid this issue and ensures a cleaner result.
It’s also worth checking files before sending them to print. Some images appear to have transparent backgrounds but actually contain a hidden layer or colour. Reviewing the file in different software or against a contrasting background can reveal any issues before printing begins.
Selecting the correct format from the start reduces the need for adjustments later. It ensures that the file remains flexible, high-quality, and suitable for the intended printing method.
4. Colour and Print Accuracy
Colour behaves differently in print than it does on screen. Screens display colour using light (RGB), while printing uses ink (typically CMYK or similar ink systems, depending on the method). That difference means colours that appear bright and vivid digitally may look slightly different once printed onto fabric.
RGB (Red, Green, Blue) works well for digital displays because it combines light to create colour. CMYK (Cyan, Magenta, Yellow, Black) works by layering ink. Because these systems operate differently, some colours simply cannot be replicated exactly when moving from screen to print.
Bright neon tones, for example, often appear less intense when printed. Deep blacks can sometimes look slightly muted depending on the garment and print process. Subtle gradients can lose smoothness, especially when the file lacks proper preparation.
Fabric colour also affects the final result. Printing on a white garment usually produces the most accurate colour output because the base doesn’t interfere with the design. Printing on darker garments often requires a white underbase layer, which can slightly alter how colours appear on top.
Contrast becomes especially important in this context. A design that relies on subtle colour differences may look clear on screen but become harder to distinguish when printed. Strong contrast between elements helps maintain clarity once the design transfers onto fabric.
Testing colours before committing to a full run is always a good approach. Even small adjustments — such as slightly increasing contrast or brightness — can make a noticeable difference in the final print.
Designers should also avoid relying too heavily on screen previews. What looks perfect on one display may appear different on another due to screen calibration, brightness settings, or colour profiles. Viewing the design across multiple screens can help identify potential issues early.
Simplifying colour choices can also improve results. Clean, well-defined colours tend to print more consistently than overly complex combinations. Designs don’t need to be basic, but clarity should always take priority over unnecessary complexity.
Understanding how colour behaves in print helps avoid surprises. When the file accounts for these differences, the final result will feel closer to the original intention.
5. Common Mistakes and How to Avoid Them
Many print issues come down to a handful of common mistakes. Most of them are easy to fix once you know what to look for, but they can significantly affect the final result if ignored.
Low-resolution images are one of the most frequent problems. Designs that look acceptable on screen often fall apart when printed because they don’t contain enough detail. Starting with a high-resolution file at the correct size avoids this issue entirely.
Over-compressed files can also reduce quality. Saving images repeatedly as JPEGs, or using files downloaded and re-uploaded multiple times, often introduces visible compression artefacts. These can appear as unwanted noise or distortion once printed. Using high-quality source files and avoiding unnecessary compression preserves detail.
Incorrect sizing is another common issue. Designs that are too small may look insignificant on a garment, while oversized designs can lose clarity if the file isn’t large enough to support them. Setting the artwork to the intended print size from the beginning ensures that proportions and detail remain consistent.
Poor contrast can make designs difficult to read once printed. Colours that appear distinct on screen may blend on fabric, particularly on darker garments. Increasing contrast and simplifying colour relationships can improve readability.
Background issues also appear frequently. Designs without proper transparency may include unwanted backgrounds that print as solid shapes. Checking files carefully before printing ensures that only the intended design elements appear on the garment.
Getting these details right is essential for anyone planning to use custom t-shirt printing, as even small issues with resolution or file setup can significantly affect the final result.
Another mistake involves relying too heavily on low-quality source material. Screenshots, heavily compressed images, or files taken from social media often lack the resolution needed for print. Starting with original artwork or high-quality exports leads to far better outcomes.
Design placement can also impact the final result. Elements positioned too close to the edge of the print area may appear awkward once applied to a garment. Keeping a balanced layout and allowing for margins helps maintain a professional finish.
Neglecting file checks before submission can cause avoidable problems. Opening the file at full size, zooming in to inspect edges, and checking colours against different backgrounds can reveal issues that might otherwise go unnoticed.
Avoiding these common mistakes doesn’t require advanced technical knowledge. It simply requires attention to detail and a basic understanding of how digital files translate into print.
Getting Print-Ready Results
Preparing images for t-shirt printing doesn’t need to be complicated, but it does require the right approach. Small details — such as resolution, file format, colour, and sizing — can have a significant impact on the final result.
A design that looks strong on screen needs the right technical foundation to perform well in print. Without that preparation, even well-designed artwork can lose clarity, colour accuracy, or overall impact once applied to fabric.
Understanding resolution ensures that images remain sharp. Choosing the correct file format preserves quality and flexibility. Adjusting colour expectations helps maintain consistency between screen and print. Paying attention to common mistakes prevents avoidable issues that can affect the finished product.
These adjustments may seem minor, but they make a noticeable difference. Taking the time to prepare artwork properly leads to cleaner prints, stronger designs, and more consistent results.
For designers, creators, and beginners alike, building this understanding creates confidence. It removes uncertainty and allows ideas to translate more effectively from digital concepts into physical products.
Once the basics are in place, the process becomes far more predictable. Designs look sharper, colours feel more accurate, and the final result reflects the original vision more closely.
Good preparation doesn’t just improve print quality. It improves the entire experience of turning an idea into something real.
Online Tools and Converters
- DPI Converter
- ICO File Generator
- WebP to JPG
- WebP to PNG
- JPG to PNG
- PNG to JPG
- JPG to BMP
- JPEG to JPG
- Invert Image Colors
- Convert to Black and White Image
- Compress Image
- Crop Photo
- High SGPT SGOT danger level explanation and what your liver tests really mean
- Free PDF Converter Online – Fast, Secure & Unlimited File Conversion
- How Image to Text Tool Works
- How Reverse Image Lookup Works
- How to add a Tag in an mp3 file?
- The Future of Email Marketing
- Affiliate Marketing Or Influencer Marketing
- 5 Effective Tips to Minimize Unwanted Spam in Your Inbox
- Classifieds website for immigrants in the United States
- How to Prepare Images for High-Quality T-Shirt Printing
- Why aaPanel Is a Better Choice for Image-Heavy Websites
- Why rent a Hong Kong VPS with cryptocurrency for your digital project
- Jay Club: A Simple Guide to Login, Games, and Platform Features